
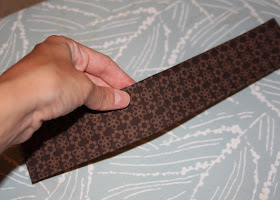
Here is the fabric before cutting. Both sides have the border. I bought a ton of this fabric last summer because I was planning to make a bed skirt for my daughter's crib with it. I had to find another use for it because she is no longer in a crib! I might even make a skirt for myself with it.


Using sections of the fabric without the border, cut the chest band piece and the strap pieces:


Step 4: Mark the middle, back and sides of the main dress piece with safety pins or chalk.


Sew the bias tape all the way around edges so that each piece of fabric becomes a dress strap.

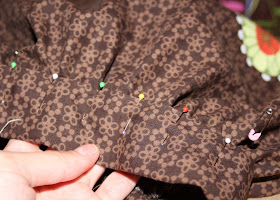
Step 8: Pin 2 straps to the inside front and pin 2 straps to the inside back of the dress chest band so that they hang about 1/2" down into the dress. The spacing from the middle will depend on your child's size, but I pinned Sienna's 2.75" from the middle for the front and 2.25" from the middle for the back.


Step 1: Cut out your fabric pieces:
Cutting your main piece you may need to add extra width in order to match the pattern:
Using sections of the fabric without the border, cut the chest band piece and the strap pieces:
Note: If your fabric has NO stretch at all or you are sewing for a child under 12 months old, you might want to add another 1" to your chest band measurement (i.e. 7" x chest measurement plu 2.5"). This will give you some extra breathing room...especially for those roly poly bellies!

Step 2: For your main piece, match the pattern and sew up the side with 1/4" seam and finish the edge.

Open the main piece up to the right side and iron your seam to make sure you have matched the pattern properly.


Step 3: Fold the chest band in half (right sides together) and sew the shorter sides together using a 1/4" inseam. Then, press the seam open with iron.
Fold the chest band in half and iron the fold.

Open the chest band up and the fold both sides inward to the middle. Iron the folds.

Fold both sides closed and iron.

Step 4: Mark the middle, back and sides of the main dress piece with safety pins or chalk.

Sew all the way around the top of the main dress piece about 1/4" from the edge using your longest stitch setting (about a 6 or 7). You will use this stitching to create the gathering in the ruffle. I like to overlap the beginning and end of this stitch line (but don’t sew over the other!) so there isn’t a gap in the gathering where the threads end. Be careful when pulling your thread through and work in small increments or you might break the thread! Gather the fabric until you get it to be the same width as your chest band. Tie off your thread.

Step 5: Mark the front middle, back middle and sides of the chest band with pins.

Match the pins of the chest band to the pins of the gathered main dress piece at the front, back and sides. Slip the main dress piece up into the chest band about 1/2" and pin in place.

In between the pins, make sure that the gathered fabric is spaces evenly and add more pins around the dress to keep the gathering in place.
Step 6: Sew on top of the chest band about 1/8" above the main dress piece to attach. Sew all the way around periodically straightening the dress piece.

Step 6: Sew on top of the chest band about 1/8" above the main dress piece to attach. Sew all the way around periodically straightening the dress piece.

Step 7: Take your small 1.5" x 11" pieces and turn them into bias tape. Use the tutorial from my pillowcase dress post if you haven't done this before!

Fold in the ends of the bias tape.
Sew the bias tape all the way around edges so that each piece of fabric becomes a dress strap.
Step 8: Pin 2 straps to the inside front and pin 2 straps to the inside back of the dress chest band so that they hang about 1/2" down into the dress. The spacing from the middle will depend on your child's size, but I pinned Sienna's 2.75" from the middle for the front and 2.25" from the middle for the back.
Sew 1/8" down from the top of the dress to attach the 4 straps all the way around.

And you are done! The straps tie into bows above each shoulder.

And you are done! The straps tie into bows above each shoulder.
Just a note: you can use any fabric for this dress....I was just inspired by the "border" fabric. Two contrasting fabrics would work well for the chest band and an added border at the bottom of the dress!
Here is Sienna wearing her new dress! Feel free to email me if you have questions or get stuck on my tutorial! Click here to see the gallery of photos that other readers have sent me!


No! You did not make this dress!! This has got to be my all time Lil Blue Boo fave. Ash you are amazing!
ReplyDeleteOH MY! Just adorable!! Thanks for sharing :) now if only I could sew that nicely.....sigh
ReplyDeleteI love this!!
ReplyDeleteStopping by from SITS and wanted to invite you to visit my charity, Spirit Jump, we are a group that sends cards & gifts 2 ppl battling cancer. If you want to join us or learn more stop on by. We list our members on our site and encourage others to purchase their Spirit Jump gifts from other jumpers :)
http://www.spiritjump.com
beautiful dress! You make it look easy. I've been quilting for over 11 years, but I haven't given clothes making a real try. I might have to try this pattern someday.
ReplyDeletelooooove it! Yup, another WOW from me :) Fab tute btw! You rock!!! :)
ReplyDeleteOh I wish I had a skirt (for me) in that, it's so cute!!
ReplyDeleteSO cute! You are a rockstar...30-45 minutes, my bum. It would take me HOURS! But I still may try!!
ReplyDeleteAbsolutely darling! I can't wait to try it! Thanks so much for posting the tutorial!!
ReplyDeleteOh this is so so so cute! Any tips on making it in a smaller size (Like 12 mos?) Fabulous!
ReplyDeleteI ABSOLUTELY love that material! The dress (and model) are so cute! I linked to this at somedaycrafts.blogspot.com
ReplyDeleteThank you. After seeing your pattern on here, I'm feeling inspired.
ReplyDeleteWhat's funny is that I make quilts- put together on the machine, hand applique', and then quilting them on the long-arm quilting machine. My friends mention their sewing projects- i.e. hemming and fixing a button, but I don't know much about that stuff at all! I guess it's time to learn!
Where did you buy your material?
thanks for the tutorial!! the dress is adorable.
ReplyDeleteI have just recently found your blog, but LOVE everything you create!! Thank you for the inspiration and the tutorials..I am just a newbie to sewing, but I am ready to give it a try! And I agree with nikonniko, a 12 month version would be perfect!
ReplyDeleteYour daughter is a lucky girl to get all the cute things you create!
Pretty!
ReplyDeleteIt is so adorable! I love it! The fabric, the pattern and the tutorial. I would also like a skirt of my own out of that fabric... might have to get some.
ReplyDeleteOMG!!! I absolutely LOVE that dress!!! I am new to sewing and don't think I can actually accomplish that - but you give me hope if I keep practicing I may eventually get there. Thanks for sharing : )
ReplyDeleteThanks again Ashley for offering this awesome FREE & easy tutorial! I made Serenity a dress yesterday and took pictures of her wearing it today. I just finished a post on my blog about it! Go check it out when you get the time: http://treasuresfortots.blogspot.com/
ReplyDeleteThanks so much!!
Look at those curls! And those sweet little girl bare feet!! Oh yeah, and the dress is killer too!
ReplyDeleteI posted a link to your tutorial on Craft Gossip Sewing:
http://lilblueboo.blogspot.com/2009/06/border-fabric-sundress-tutorial.html
--Anne
Like I said, you need a show! And how ADOREABLE is S. with her cute curls! Next time I head out to Palm Desert I'm stoppin' by...
ReplyDeleteThis is such a cute little dress...HUMMM now only if I had a little girl to make one for...
ReplyDeleteGreat tute! Love it! I am going to have to try this one :)
ReplyDeleteThat's a lovely dress. I love the colours too! And the model is really cute also :-)
ReplyDeleteThis is so, SO cute! Thanks so much for sharing, I'll be linking.
ReplyDeleteThis is adorable! I love the colors.
ReplyDeleteI'm here from One Pretty Thing and this little dress just cannot let me be quiet. It is absolutely charming. I only wish I had a little girl to sew for. Precious!!
ReplyDeleteThis is exactly what I have been looking for. Thanks so much!
ReplyDeleteThankyou! I love this idea. Only problem is my only fabric with a border pattern is an old tablecloth. It's beautiful but I think my girls will definitely look they're wearing tablecloths!
ReplyDeleteI found you via Oneprettything and am so happy I did. I love this--I have 3 boys but will be making it for the only girl cousin in the family. She will love it--thanks for the inspiration :).
ReplyDeleteI saw your tutorial on One Pretty Thing and tried it that very night. Love it!! I posted the dress: http://secretstitchclub.blogspot.com/2009/07/sweet-sundress-stitchin.html
ReplyDeleteThanks for a great tutorial!!
Oh so cute! I can't wait to try this! I am a sewing novice, but I think I might be able to pull it off...THANK YOU for sharing such a detailed tutorial! Your little girl looks adorable! :0)
ReplyDeleteBlessings!
Brandi
Seriously an adorable dress and an even cuter girl! I absolutely love it.I have two little ladies that would probably like their own. So sweet.
ReplyDeleteThis is absolutely the cutest sundress I have ever seen. My question is using the same directions as to measuring chest, under armpits to knees etc could this also be used to make a dress for a grown-up? I want to become a follower of your blog cause I love it.
ReplyDeleteBarbara
That is adorable! Great tutorial. I am definitely making this :). Thanks for sharing.
ReplyDeleteThis dress is so cute ! And the fabric is really beautiful !
ReplyDeleteVery cute.
ReplyDeleteI just used your tutorial to make one for my daughter.
Thank you for posting it! Your instructions were great and easy to follow!
Ashley,
ReplyDeleteThank you for your comment! And yes, you may add a photo to your gallery.
Thanks again for the tutorial!
Ashley, this is a gorgeous dress! And lining up the print so the flowers match at the seams is so great. My aunt does that all the time with her projects - she is an amazing seamstress; drafted (from scratch) and sewed like 10 different dresses within a week for my eldest two years ago. Insanely good. Thank you for stopping by my blog. I wish I'd seen your giveaway earlier! It's too late to enter now. Rats. Have a question for this sundress - how does it fasten? Did you have a zipper or is it made from a stretchy knit material? Maybe you mentioned it somewhere in the tutorial and I missed it. If so, sorry- just say so and I'll go re-read it.
ReplyDeleteThank you so much for your tutorial. I've added your link to my blog. This dress is so simple and comfy. Great design!
ReplyDeleteI just made this dress and it is ADORABLE! I added a little tulle ruffle on the bottom since mine didn't have a border and I used the same pattern for the whole dress. It turned out so great. Thanks so much for this. I love it!
ReplyDeleteI made your dress and posted it on my blog today! I linked back to you for the tutorial. I hope you don't mind.
ReplyDeletesongberries.blogspot.com
Fabulous tutorial - and I love the result. You can check it out here:
ReplyDeletegimmeashimmyshake.blogspot.com
Thanks!!
This is sooo cute!! I saw it and instantly knew I wanted to make one for my daughter! You can see pictures of the finished project on my blog: http://themiller6.blogspot.com/
ReplyDeletethanks so much for posting this! I've added you as a favorite! Can't wait to read more!!
I LOVE LOVE LOVE this dress! I've never made a dress, would this be too hard for my first one? I've been sewing other things for about a year, but have been too intimidated to make clothes, but this dress would be darling on my daughter and I need to get outside my comfort zone! If you'd like to check out a few of my blogs they are miamoodesigns.blogspot.com and katiehatchphotography.blogspot.com
ReplyDeletebeautiful as always!!!
ReplyDeleteI love this...such a cute summery dress, I'm going to have to try this!
ReplyDeleteI made my third sundress today for my 2 year old. I made some fun changes-added braided straps through a loop in the back and added a ruffle botton. You can see it here-http://www.ellzabelle.com/2010/03/toile-sundress.html
ReplyDeleteThanks for the great directions! I'll be making my daughter a lot of these for the summer! Ellen
Thank you so much for this excellent tutorial. I made one last night and I'm linking to you from my blog: http://kids-couture.blogspot.com/2010/03/bring-on-summer.html
ReplyDeleteThanks again!!
Caroline
This is so darling! Thanks for sharing how you made it!
ReplyDeleteAnother great project - thanks so much for sharing. If you want to see my attempt check out the following which I have linked back here:
ReplyDeletehttp://craftymumnz.blogspot.com/2010/03/sundress.html
I upcycled one of my skirts to make this sundress for my 3 year old. Thanks for the tutorial! http://www.thesellers.net/2010/04/upcycled-skirt-to-sundress/
ReplyDeleteHi.. thanx for your tutorial
ReplyDeletei've made one for my little girl, you can see her here : http://childhood-obsessions.blogspot.com/2010/05/handmade-dress-for-zakiyya.html
oops, almost forgot, i've put you on my blogroll
Adorable.. thank you so much for sharing this tutorial!
ReplyDeleteThank you for the tutorial! I made one for my daughter and she looks so pretty wearing it!
ReplyDeletehttp://wendilerias.blogspot.com/2010/08/vestido-para-mi-carolina-y-bolsas-con.html
many thanks!
ReplyDeletehttp://thejacksgraze.blogspot.com/2010/08/dress.html
I just made a dress using this tutorial. I wasn't making it for anyone in particular but more messing about with the sewing machine. Those darn straps!! Took longer then the rest of the dress!! And of course I stupidly used a REALLY stretchy fabric... next time I'll be using something nice and stiff like Corduroy me thinks!
ReplyDeleteDeberian tener la opcion de idioma, se lo agradeceriamos muchos latinos
ReplyDeletegracias
Love this dress. I can't wait to get started on some for my girls. Thanks for sharing! We will be featuring you on our blog, ziggycrafts.blogspot!
ReplyDelete