I just finished these little mosaics for the wall going from our kitchen to the butler's pantry. It is an awkward space because it steps down from the kitchen and the wall is tall and narrow. I needed something long and narrow to fill the space and look proportional. I also knew that I wanted something dimensional, colorful and unique. I'm so happy with how they turned out.

Huge bonus I discovered once they were done: Each little art piece is a mystery game for my 2-year-old! She loves to point out each square and guess what it is....she can point out Mommy's cereal (Raisin Bran), Daddy's cereal (Go Lean Crunch), pancakes, goldfish, crackers etc.
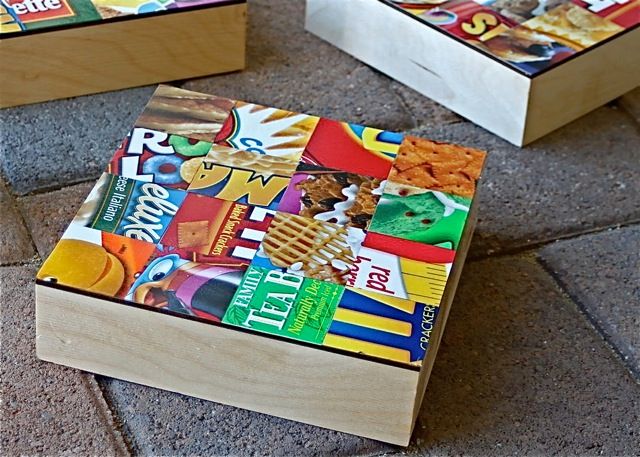
I've been saving all of these boxes for a year. I had grand plans of cutting them all into little 1 inch squares, sorting them by color and making a huge fruit or veggie mosaic with them to decorate our kitchen. Since I've never gotten around to that, and we seemed to have run out of wall space I made some smaller more manageable mosaics.


First, I cut out lots of 2 inch squares from all the boxes so that I had an interesting selection of colors. (I actually cut the squares about 1/16th larger than 2 inches so that the cardboard would hang over the edge slightly.)


I made a small template to make the cutting process easier.

Here is Sienna working on her own mosaic. (Sorry she didn't dress up for her photo op)

Then I laid out the squares in a design that I liked. For the base, I bought 8 x 8 inch cradled Gessobord (2 inch deep). You can usually buy these at your local craft store. I got mine at Aaron Brothers with their weekly coupon.


I worked in rows...brushing on a generous layer of medium and placing the squares in place and then brushing a layer of medium over top as well.


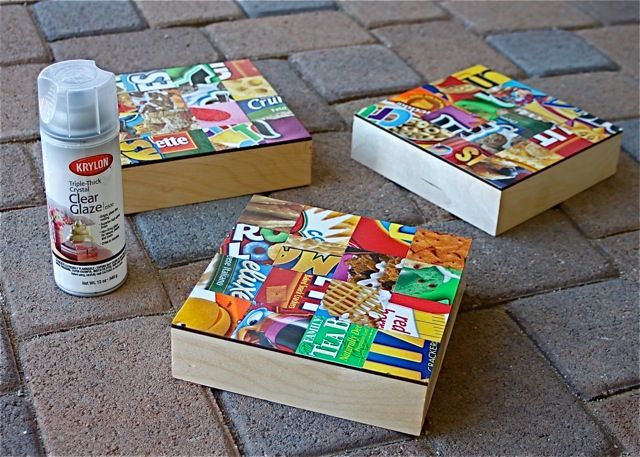
As I finished each row, I laid wax paper on top and used a brayer to roll out any air or glue bubbles underneath. This also helps to make sure that the squares are adhering flat. (Note: If you don't use wax paper, your top layer of the cardboard squares will begin to disintegrate or peel....you'll end up with a huge mess.)
Note: Only leave the wax paper on for a few seconds as you roll out the bubbles.....it will leave a waxy residue if you let it dry onto the squares. You can also use freezer paper for this step.


After the squares were completely dry, I took a razor blade and with a "sawing" motion cut off any excess cardboard down the sides.

I made three different mosaics.

I didn't have to use any hardware for hanging. The boxes are so deep that I just put 2 inch wire brad nails 6.5 inches apart into the wall and hung them.
oh my gosh i loooooove these!! what a neat idea! i'm totally gonna try that!
ReplyDeleteYou've been saving the boxes for a year!!!?? You are incredible girl! :) they came out great, I love them!!
ReplyDeleteWow! I would've given up and recycled those boxes by now! :)
ReplyDeleteHi from SITS! This is such an AWESOME idea! I LOVE it! Thanks for sharing!
ReplyDeletecool, COOL! Fun idea! thanks for sharing.
ReplyDeleteFabulous idea....LOVE it! xo
ReplyDeleteThanks for stopping by my blog! What a fun & creative idea. Your daughter is darling & her hair is just beautiful! Love those curls! Have a great day.
ReplyDeletesuch a cute way to recycle too! :)
ReplyDeletefound you through One Pretty Thing's DIY roundup!
These are so cute! I just saw something similar to this at World Market last week as was wondering how they made this. Thanks for the tutorial!!
ReplyDeleteThanks for sharing this - what a fantastic idea.
ReplyDeleteCharity - don't leave the wax paper on it....it will leave a residue! Only leave it on for a few seconds as you use the roller on top. Great question.....I'll edit my post to add that ;)
ReplyDeleteVery cool idea! What fun, and appropriate for the wall space.
ReplyDeleteMy hero.. again..
ReplyDeleteOk - I cannot wait to try some of these.. I cannot wait to tell everyone, that i tried these !!
Great to meet you !!
These are so great! Im totally going to try it!
ReplyDeleteOh I love these! I might have to play around and do something similar. We are in a rental and it's really hard to make it feel like my own.
ReplyDeleteThese are so cool!! What a unique & fun idea. :)
ReplyDeleteFABULOUS!!!!!!
ReplyDelete