I love art that looks old, a little rare, antique.......like maybe it was acquired from an estate sale or maybe even an auction at Sotheby's. But I don't like to spend large amounts of money on art.....so I have to improvise. Here is a quick and easy painting tutorial....I promise anyone can do it as long as you can follow some directions.

Here is the color palette I used. I also used some white gesso and a small crackle finish kit.


Step 10: You can get a small "fragile" cracklekit like the one shown in my Frida tutorial at your art or craft supply. It is two step process and you can follow the directions on the bottle....but basically you are going to cover your canvas with a thin layer of the "step 1" bottle, let it dry until it is clear and then repeat with the "step 2" bottle. As it dries, tiny hairline "crackle" will begin to form. Then I spread another layer of brown glaze making sure to work it into the cracks and then wiped off the excess. You may want to do this several times until you achieve the "aging" effect you like.


Step 1: I was out of 8x10 canvas so I used a thin piece of hardboard. I covered it with newspaper, matte medium and then gesso. See my painting tutorial from last week for details on this step.

Step 2: Start blocking in some of your colors: some sky, some hay fields or marsh land (who can even tell the difference), and some green tree lines.

AND....this is the MOST important part: you have to give up painting with your dominant hand. I am right-handed but I paint with my left hand. Most of the problems I see when teaching people to paint is that their dominant hand is too "controlled" and they think too hard. As soon as I get frustrated with a painting the first thing I do is switch to my left hand!

Step 3: After your first coat of paint dries a little start filling in some of your larger sections by applying paint with a palette knife.

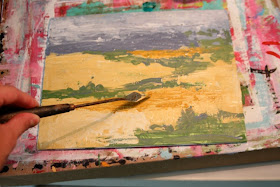
Use the point of the palette knife to draw in some texture....as if you were drawing in some plants. It will look like you are just making a mess but it will work out.....

Every once in a while move your palette knife to a new section without cleaning it off so that you get some colors mixed in where you think they "shouldn't" be.

Step 4: Take a small paint brush and work in some some lighter colors randomly where your "scrape" marks are (I mixed white in with my yellow for this).

Work in some dark green and some dark blue where your tree lines are.......

.......don't focus on one area too much....work in a random fashion using a "dabbing" motion.

Here is what my painting looked like at this stage:

Step 5: Take your palette knife and work in some darker blue where the sky meets the landscape. I work in "dabs" and small horizontal strokes.

Work some white and lighter blue into some areas of the upper sky.

Step 6: Work a little white and yellow into the lower landscape....using different dabbing motions.

Take a darker yellow like an "ochre" and work it horizontally into a few areas.

Step 7: Take a paint brush and with short and long horizontal strokes blend some of your paint across in areas. Then work vertically in few areas to give the illusion of some long "grasses." Then let all your paint dry thoroughly.

Step 8: Sand your painting down until you start to see some of the paper areas show through.

Step 9: Take some dark brown paint and water it down a little to make a thin glaze (I use Golden Fluid Acrylics because they thin well and are a nice glaze layer, but any paint will work). Spread the brown glaze layer making sure to get it into the places where the paper is showing through. The paper layer will soak this glaze up and turn a brownish color. Take a cloth or paper towel and wipe off the excess paint.

Step 10: You can get a small "fragile" cracklekit like the one shown in my Frida tutorial at your art or craft supply. It is two step process and you can follow the directions on the bottle....but basically you are going to cover your canvas with a thin layer of the "step 1" bottle, let it dry until it is clear and then repeat with the "step 2" bottle. As it dries, tiny hairline "crackle" will begin to form. Then I spread another layer of brown glaze making sure to work it into the cracks and then wiped off the excess. You may want to do this several times until you achieve the "aging" effect you like.

Don't forget to sign your painting! This isn't my signature I use for my portraits and nursery art....it is my "fake masterpiece" signature I "made up" today.

Just make sure to pick a frame worthy of your painting..... and one that makes it look even older!

Great landscape - straight from Sothebys :) Loved the tutorial...thanks for sharing!
ReplyDeleteChelsea
That does look old! I wish I had creative mind like that. I cant see something before it is made :(
ReplyDeleteThat is so cool! You paint with your left hand and you're right handed?! That's just so cool! I wonder how a Louisiana bayou swampland filled with moss-draped cypress trees would turn out? Hmmm...
ReplyDeleteThat was amazing! Thanks for the tutorial...and the whole left hand thing... Brilliant!
ReplyDeleteWOW. This is absolutely awesome!
ReplyDeleteyou just made that look sooo easy.
ReplyDeleteI love this. you're art is soo awesome. can you just do some art giveaways and rig it for me to win? that would be great :)
ReplyDeleteWow! I recently bought a painting that looks very similar to this! Now, I'm going to have to try making it a matching set. Thanks!
ReplyDeleteAh, you just put this art dealer out of business ;)
ReplyDeleteWow, that is so cool and looks like so much fun! I'll be linking.
ReplyDeleteThat one blew my mind!!! Wow.
ReplyDeleteYou make things look so simple!
ReplyDeleteWhat a wonderful project!! I will give it a try!
ReplyDeleteAnd I LOVE the suggestion to paint with the left hand if naturally right-handed!! I never thought of doing it but it makes perfect sense since the left hand is ruled by the right hemisphere and that is the creative part of the brain.
Wahooooooo.
ReplyDeleteThank you thank you thank you.
Oops hit enter too early. I never ever thought of switching hands.... totally clever girlie.
ReplyDeleteAbsolutely brilliant! Just found your blog and I'm already in love with it! Consider me a loyal follower.
ReplyDeleteGenius!!!!! This is just simply fantastic, it looks as if you had worked hours watching that landscape in reality until you were able to paint it! hahaha Awesome, thanks for sharing :)
ReplyDeletehugs, Erika
Im going to try and copy that and see how it goes..I'll let you know :) Now what I really need to make is a seascape. Id think it'd be similar to this one in technique?
ReplyDelete